GPUImage – Inputs

Previously, I have analogised the GPUImage processing with a kind of pipeline. Thus, the GPUImageFramebuffer has been interpreted as a “flowing carrier” in the processing pipeline in the previous post. The previous post explained that GPUImageFramebuffer is a “flowing carrier” in the pipeline. In regard to this post, I would like to introduce the ‘sources’ that could be as the input of the pipeline. GPUImage provides five input classes:

  • GPUImagePicture
  • GPUImageRawDataInput
  • GPUImageUIElement
  • GPUImageMovie
  • GPUImageVideoCamera.

Each of them is a sub-class of GPUImageOutput and does not need to follow the GPUImageInput protocol during the entire process. Let’s say if there is an object of a subclass of GPUImageOutput, it can be transmitted with its information to the next node in the pipeline Object. And only the objects of the class that adopt the GPUImageInput protocol can receive and process the information from the previous to the next. Therefore, as an input, there is no necessary to receive information from other nodes, but a one-way delivery. Five different input sources are introduced as the following content.

1. GPUImagePicture

This is one of the class I use frequently for implementing processing pictures. There are five initialisation methods for GPUImagePicture, whereas the final implementation is completely consistent that all of them would catch CGImage objects and load into textures. That is, these initialisation methods will eventually call the following initialisation method.

- (id)initWithCGImage:(CGImageRef)newImageSource smoothlyScaleOutput:(BOOL)smoothlyScaleOutput;

– Variables

CGSize pixelSizeOfImage;   

The actual size data of a picture would be saved as this variable during initialising an input object. However, if the actual pic size is greater than the maximum size that the GPU can provide for storing the texture, pixelSizeOfImage would be equal to this maximum size.

BOOL hasProcessedImage;

It is set as NO when initialising its object. This variable is used to control if each node object should perform a specific process when calling – (void)addTarget: method during initialising the processing chain. And The judgement is only executed when it is actually in the process.

dispatch_semaphore_t imageUpdateSemaphore;

The semaphore object is used to deal with the order of execution in multithreading. In different groups, semaphore has a smaller granularity. This variable is initialised in the initialisation method, which is applied in the-(BOOL) processImageWithCompletionHandler: (void (^) (void)) completion method. The specific function is to prevent data inconsistency caused by multiple calls.

– Initialisation

1. Obtaining the size of the picture object. If the width or height equals to 0, the process would be broken by an assertion. It should be noticed that there is one more judgment here. The comment means that if the size of the picture exceeds the maximum size of the texture, the picture needs to be compressed by the limited size.

// For now, deal with images larger than the maximum texture size by resizing to be within that limit

CGSize scaledImageSizeToFitOnGPU = [GPUImageContext sizeThatFitsWithinATextureForSize:pixelSizeOfImage];

2. I could not understand the use of shouldSmoothlyScaleOutput property well until grasping the mipmap technology. The default value of shouldSmoothlyScaleOutput is NO. In this situation, the texture would not be processed and stored using mipmap. If it is YES, the width and height of the picture must be an integer value as multiple of 2.

if (self.shouldSmoothlyScaleOutput)


{

// In order to use mipmaps, you need to provide power-of-two textures, so convert to the next largest power of two and stretch to fill

CGFloat powerClosestToWidth = ceil(log2(pixelSizeOfImage.width));

CGFloat powerClosestToHeight = ceil(log2(pixelSizeOfImage.height));

pixelSizeToUseForTexture = CGSizeMake(pow(2.0, powerClosestToWidth), pow(2.0, powerClosestToHeight));

shouldRedrawUsingCoreGraphics = YES;

}

Mario_Q indicates the overall understanding of Mipmap as follows. Mipmap is a powerful texture technology, which can improve rendering performance and enhance the visual quality of the scene. It can be used to solve two common problems that occur when using general texture mapping:

  1. Blinking, when the surface of the object being rendered on the screen is very small compared to the texture image to which it is applied, flickering occurs. Especially when the camera and objects are moving, this negative effect is easier to see.
  2. Performance issues. After loading a large amount of texture data, it must be filtered (reduced), and only a small part is displayed on the screen. The larger the texture, the greater the performance impact.

Mipmap can solve the above two problems. When loading textures, not just loading a texture, but loading a series of textures from large to small in mipmapped texture state. Then OpenGL will choose the most suitable texture according to the size of the given geometric image. Mipmap is to scale the texture by a multiple of 2 until the image is 1×1 in size, then store these maps, and choose an appropriate image when you want to use it. This will add some additional memory. Using mipmap technology in the square texture map, it is probably more than one-third of the original memory space.

3. If the value of picture size is ok and shouldSmoothlyScaleOutput equals to NO, then you need to determine whether the picture object meets the storage configuration of GL by comparing the standard configuration with the CGImage properties. Otherwise, it needs to redraw to generate a new CGImage object.

4. The detailed redrawing process is as follows. First, open up a section of image data storage space and record this section of the address as imageData. After redrawing, an address that stores the image data to be used would be caught. If there is no necessary to redraw, the CGImage object can be directly loaded to the address through the method.

// For resized or incompatible image: redraw

imageData = (GLubyte *) calloc(1, (int)pixelSizeToUseForTexture.width * (int)pixelSizeToUseForTexture.height * 4);

CGColorSpaceRef genericRGBColorspace = CGColorSpaceCreateDeviceRGB();

CGContextRef imageContext = CGBitmapContextCreate(imageData, (size_t)pixelSizeToUseForTexture.width, (size_t)pixelSizeToUseForTexture.height, 8, (size_t)pixelSizeToUseForTexture.width * 4, genericRGBColorspace,  kCGBitmapByteOrder32Little | kCGImageAlphaPremultipliedFirst);

//        CGContextSetBlendMode(imageContext, kCGBlendModeCopy); // From Technical Q&A QA1708: http://developer.apple.com/library/ios/#qa/qa1708/_index.html

CGContextDrawImage(imageContext, CGRectMake(0.0, 0.0, pixelSizeToUseForTexture.width, pixelSizeToUseForTexture.height), newImageSource);

CGContextRelease(imageContext);

CGColorSpaceRelease(genericRGBColorspace);

5. This step is to load input information to the texture (this involves using the encapsulated serial queue and the current EAGLContext object, which will be explained in a separate article afterwards). Firstly, preparing the outputFramebuffer of the input. Secondly, the texture parameters should be configured if Mipmap technique is taken into account. Then, loading the pic information into the texture. Finally, a mipmap would be generated after loading if Mipmap is available.

glBindTexture(GL_TEXTURE_2D, [outputFramebuffer texture]);


if (self.shouldSmoothlyScaleOutput)

{

glTexParameteri(GL_TEXTURE_2D, GL_TEXTURE_MIN_FILTER, GL_LINEAR_MIPMAP_LINEAR);

}

// no need to use self.outputTextureOptions here since pictures need this texture formats and type

glTexImage2D(GL_TEXTURE_2D, 0, GL_RGBA, (int)pixelSizeToUseForTexture.width, (int)pixelSizeToUseForTexture.height, 0, format, GL_UNSIGNED_BYTE, imageData);

if (self.shouldSmoothlyScaleOutput)

{

glGenerateMipmap(GL_TEXTURE_2D);

}

glBindTexture(GL_TEXTURE_2D, 0);

6. Finally, do not forget releasing the objects in the CoreGraphic and CoreFundation framework created during the process.

free(imageData);
CFRelease(dataFromImageDataProvider);

– Image Rendering

- (void)processImage;

The above method will be called very frequently during processing. After the entire processing chain is set up, if you want to display the processed final result on GPUImageView or export it, or even export the image directly from the filter node in the middle, you need to perform the following methods. As the name implies, the purpose of this method is to tell the input source to start processing incoming pictures. Looking at the specific implementation code, you will find that the actual operation is equivalent to passing the image content and parameters owned by the input source to the next node or nodes in the chain.

The following figure is a multi-branch processing chain. After processing Filter1, you can export pictures that only have the effect of Filter1; after processing Filter2, it will be displayed on the GPUImageView object; after processing Filter3, it will continue to pass to Filter5 for the next rendering. Each arrow is equivalent to a fuse, then the lighter is to call processImage method of GPUImagePicture object.

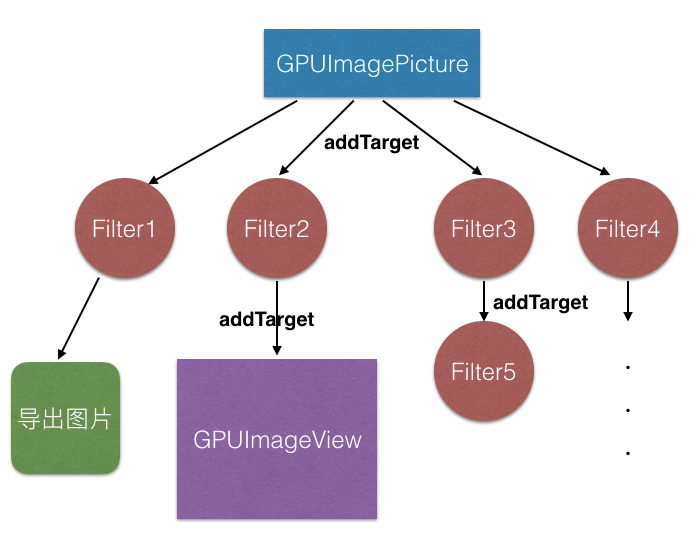
The processImage method basically just call processImageWithCompletionHandler: method. Through the loop to traverse the already added targets, such as Filter1, Filter2, Filter3, Filter4 in the above figure. Be aware that this for loop is executed in a defined asynchronous serial queue, and semaphore is used after the loop, which means that the completion callback will not be triggered until the entire operation is completed.

for (idcurrentTarget in targets)


{

//Getting the location of the current target is related to Filter. For example, if it is a Filter with two or more input sources, the order in which each input source is added determines the corresponding processing order and thus affects the final effect. This will be introduced later in the Filter article.

    NSInteger indexOfObject = [targets indexOfObject:currentTarget];  

    NSInteger textureIndexOfTarget = [[targetTextureIndices objectAtIndex:indexOfObject] integerValue];

    [currentTarget setCurrentlyReceivingMonochromeInput:NO];

//Passing the texture size of its own FrameBuffer so that the next target can generate or obtain the same size texture for storage of processed content.

    [currentTarget setInputSize:pixelSizeOfImage atIndex:textureIndexOfTarget];

//Passing the FrameBuffer that stores the processed content itself. If it is the input, the content is the original picture data.

    [currentTarget setInputFramebuffer:outputFramebuffer atIndex:textureIndexOfTarget];

    [currentTarget newFrameReadyAtTime:kCMTimeIndefinite atIndex:textureIndexOfTarget];

}

– An easier way for obtaining image information processed via filters

GPUImagePicture offers a method for obtaining processed images more easily, whereas the integrated processing chain is the basic premise still. The situation of crashes caused by missing some code that must be written to export the image could not be considered in this way. That makes convenience. The first input parameter is the Filter object, which needs to be passed to the last Filter in the Filter chain that needs to be processed. And the second parameter is the block callback that returns an image object.

- (void)processImageUpToFilter:(GPUImageOutput*)finalFilterInChain withCompletionHandler:(void (^)(UIImage *processedImage))block;
{

[finalFilterInChain useNextFrameForImageCapture];

[self processImageWithCompletionHandler:^{

UIImage *imageFromFilter = [finalFilterInChain imageFromCurrentFramebuffer];

block(imageFromFilter);

}];

}

2. GPUImageRawDataInput

The basic process is consistent with GPUImagePicture, which is to import image data. The difference between them is that some image objects such as UIImage or CGImage format can be directly imported to a GPUImagePicture object, while GPUImageRawDataInput only accepts the binary data of an image as the content loaded into the texture. There are two ways (I only know these two, while there may be other ways existing) that can make the image object into the data content of the two mechanisms: 1.UIImage-> NSData-> bytes; 2.CoreGraphic redraws a UIImage object saved to a prescribed address. But this way of loading image data is rarely used. No one wants to take a bend to achieve the effect that GPUImagePicture can achieve. However, if you want to perform some specific effects to the image by CoreGraphic before loading it, you can use GPUImageRawDataInput to load the processed data directly without having to generate a picture object.

This class has two public variables that are the same as the GPUImagePicture class. And there are three initialisation methods in total, and ultimately the last method is called. Firstly, let’s focus on the four input parameters of this method:

- (id)initWithBytes:(GLubyte *)bytesToUpload size:(CGSize)imageSize pixelFormat:(GPUPixelFormat)pixelFormat type:(GPUPixelType)pixelType;

bytesToUpload

GLubyte is a data type in OpenGL framework, an unsigned single-byte integer, containing values ​​from 0 to 255. Converting a picture object to binary is equivalent to storing the RGB or RGBA value of each pixel in the picture with binary data. The individual colour value range of the pixel is 0 to 255, so for example, the content storage of R for a certain pixel is the minimum GLubyte unit length. Then GLubyte * can be understood as a pointer to a memory address that stores binary data. Finally, this parameter will be used as the last parameter when calling glTexImage2D function of OpenGL. The last parameter is pixels specifies the pointer to the image data in the memory.

imageSize

It presents the size of an image inputted as binary data. An image could be seen as an array of two-dimensional binary data. The first row stores the pixel data in the top row of the picture, and so forth. The binary data of the picture occupies a continuous length in the cache (the simplest case of storage is assumed), which is a one-dimensional storage form. Then, based on the data, the size of the original image cannot be read straightforwardly, which means that the length of the pixel data of the first row of the picture is unknown. Therefore, one of the purposes of this parameter is to specify the width and height of the original image when calling the OpenGL glTexImage2D function to write the texture to determine the width and height of the texture image. Another purpose is that the GPUImageRawDataInput should be employed in order to obtain its own Framebuffer.
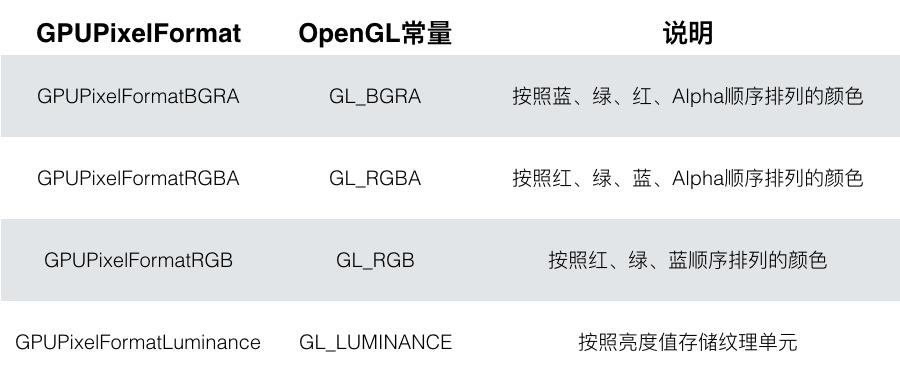
pixelFormat

This parameter is mainly used as the third parameter of the glTexImage2D function. Although there are four types in the enumeration, only two of them (GPUPixelFormatRGBA, GPUPixelFormatRGB) are actually applied when GPUImageRawDataInput is actually utilised for initialisation. It stands whether the initialized image data has an alpha channel literally. The explanation of the third parameter of OpenGL’s glTexImage2D function is: internal format specifies the colour component in the texture. The available values ​​are GL_ALPHA, GL_RGB, GL_RGBA, GL_LUMINANCE, GL_LUMINANCE_ALPHA and so forth. These optional values ​​have a corresponding relationship with GPUPixelFormat. Therefore, it’s not necessary to consider too much when setting this parameter. There are only two options: with transparency and without transparency.

Moreover, the default pixelFormat parameter is GPUPixelFormatBGRA showed on the top line of the GPUImageRawDataInput header file.

// The default format for input bytes is GPUPixelFormatBGRA, unless specified with pixelFormat:

pixelType

This parameter is also used as one of the parameters of glTexImage2D function to specify the data type of the pixel data. It can be roughly seen as the storage accuracy of binary data. GPUPixelType has only two enumeration items showed below.

Similarly, the comment states that its pixelType is set as GPUPixelTypeUByte by default.

// The default type for input bytes is GPUPixelTypeUByte, unless specified with pixelType:


3. GPUImageUIElement

4. GPUImageMovie

5. GPUImageVideoCamera


Ref:

  1. https://link.jianshu.com/?t=http://blog.csdn.net/ylbs110/article/details/51793970
  2. https://link.jianshu.com/?t=http://blog.csdn.net/huanyingtianhe/article/details/38559085

GPUImage – GPUImageFramebuffer

GPUImage cannot be used to deal with the targets like UIImage, CGImage and CIImage which are build-in classes in iOS when using GPUImage to process images or videos. So the first step of using GPUImage is that the data of images or videos you want to process should be loaded into a carrier which is defined by GPUImage, so that these data could be processed in the pipeline of GPUImage in series. The carrier I said is called GPUImageFramebuffer. Let’s say an image which includes all kinds of information of it like its pixels could be treated as a set of liquid pigments, and the most common image class in iOS -UIImage is like a colour palette. The essential step of showing an image in the device screen is to put the pigments into the colour palette. This kind of palette in GPUImage is GPUImageFramebuffer. So after pouring all pigments from UImage colour palette to GPUImageFramebuffer, GPUImage could modify or mix or do some other processing using these pigments from an image. This procedure in this post is compared to a multi-dimensional pipeline. Therefore, the process seems like a colour palette(an object of GPUImageFramebuffer) with the pigments flows through the pipeline. When the next object/node receives the palette, it would deal with the pigments and generate a new palette with the prcessed results to transmit to the next.

GPUImageFramebuffer

The properties and methods of GPUImageFramebuffer are demonstrated as follows in both English and Chinese.

//the size of the colour palette, when generating a new palette, you should know how large a palette is enough to carry the all pigments.
//颜料盒子的大小,盒子创建的时候你要知道需要用一个多大的盒子才能刚好容纳这些颜料
@property(readonly) CGSize size;  

//some settings of generating texture
//用于创建纹理时的相关设置
@property(readonly) GPUTextureOptions textureOptions;  

//the pointer of the texture object
//纹理对象指针
@property(readonly) GLuint texture; 


//This property is related to the relationship of framebuffer and texture. Texture is set as one of properties of framebuffer by GPUImage. If missingFramebuffer is YES, then this object would generate a texture. One of situations requires when it's not necessary to use framebuffer in the object of GPUImagePicture, but texture. If missingFramebuffer is NO, then the framebuffer object would be generated and then bind with the texture object generated next.
//这个属性的设置就涉及到framebuffer和texture的关系,此处先不细说。GPUImage中将texture作为framebuffer对象的一个属性实现两者关系的绑定。若missingFramebuffer为YES,则对象只会生成texture,例如GPUImagePicture对象的图像数据就不需要用到framebuffer,只要texture即可;若为NO,则会先生成framebuffer对象,再生成texture对象,并进行绑定。
@property(readonly) BOOL missingFramebuffer; 

//设置buffer大小初始化,texture设置为默认,又创建framebuffer又创建texture对象。
- (id)initWithSize:(CGSize)framebufferSize; 

- (id)initWithSize:(CGSize)framebufferSize textureOptions:(GPUTextureOptions)fboTextureOptions onlyTexture:(BOOL)onlyGenerateTexture;


- (id)initWithSize:(CGSize)framebufferSize overriddenTexture:(GLuint)inputTexture;  //自己创建好texture替代GPUImageFramebuffer对象初始化时创建的texture

- (void)activateFramebuffer; //绑定frame buffer object才算是创建完成,也就是FBO在使用前,一定要调用此方法。

//以下方法涉及framebuffer对象的内存管理,之后会具体说明。开发时基本不会手动调用以上方法。
- (void)lock; 
- (void)unlock; 
- (void)clearAllLocks;
- (void)disableReferenceCounting;
- (void)enableReferenceCounting; 

//generating image data with type of CGImage from framebuffer
//从framebuffer中导出生成CGImage格式图片数据
- (CGImageRef)newCGImageFromFramebufferContents;  

//以上方法涉及到GPUImageFramebuffer对象管理自身生成的用于存储处理后的图像数据CVPixelBufferRef对象。
- (void)restoreRenderTarget; 
- (void)lockForReading;
- (void)unlockAfterReading; 

//返回CVPixelBufferRef类型对象实际占用内存大小
- (NSUInteger)bytesPerRow; 

//返回CVPixelBufferRef类型对象
- (GLubyte *)byteBuffer; 

It could be noticed that there are three major parts of GPUImageFramebuffer.h.

  1. generation of framebuffer and texture.
  2. Memory management of objects of GPUImageFramebuffer in GPUImage.
  3. Explicit processes of CVPixelBufferRef objects which are used to save data.

1. Framebuffer and Texture

· Texture

There is a kind of definition of TEXTURE I found in a Chinese website as below (has been translated to English).

Generally, the ‘texture’ is used to represent one or more two-dimensional graphics. The object would seem more realistic if the textures were mapped on it in some specialised manners. Texturing has became an essential method for rendering in the widely used praphic system. The texture could be regarded as a groupd of colour of each pixel, while a texture indicates several characters of an object including its colour, graphic and even tactile in the real world. The texture only represents the coloured pattern on the surface of an object, but it cannot affect the object on its geometic structure. Moreover, it is just a kind of high-intensity calculation.

In my memories, when I was a graduate student, the in-class practice of computer graphic was developing 3D scenes using OpenGL framework based on C language. Although I cannot remember the detailed process of creating a helicopter clearly, there are two points I am still very impressive, which are: 1. no shape can be created excepting triangles. For examples, a square is made up of two triangles, and a circle is made up of many triangles. The more triangles there are, the less jagged the circle shows; 2. different patterns could be ‘sticked’ on the surface of a 3D graphic which are composed of 2D graphics. It seems like packaging a can. The freshly produced can is actually just a cylinder made of aluminum or other materials without any pattern outside. The last step of producing is sticking a piece of papaer or spraying the information and images on the can. Finally, cans would be delivered to different storehouses or shops, so that I was able to buy milk powder printed with a certain brand and also information on the can. As you can see, texture is the piece of paper or printed pattern outside the can.

The following methods are used to create texture objects in class GPUImageFramebuffer. The producing mechanism is the same as OpenGL ES.

- (void)generateTexture;

{

//The unit of texture could be seen as the cell for storing information of texture in GPU. More quantity of cells there are in the GPU, more expensive the GPU is. This method is used to select current active texture unit instead of to active a texture. 
//纹理单元相当于显卡中存放纹理的格子,格子有多少取决于显卡贵不贵。此方法并不是激活纹理单元,而是选择当前活跃的纹理单元。
glActiveTexture(GL_TEXTURE1);  

//Generating textures. The second input parameter is the address of texture, which points the space for storaging the generated textures. 
//生成纹理,第二个参数为texture的地址,生成纹理后texture就指向纹理所在的内存区域。
glGenTextures(1, &_texture); 

//Binding the texture created using above method with the active texture unit. In my view, this is for temporarily naming the texture unit.
//将上方创建的纹理名称与活跃的纹理单元绑定,个人理解为暂时的纹理单元命名。
glBindTexture(GL_TEXTURE_2D, _texture);  

//If the size of the displayed texture is smaller than the loaded texture, it would be processed using GL_TEXTURE_MIN_FILTER.
//当所显示的纹理比加载进来的纹理小时,采用GL_TEXTURE_MIN_FILTER的方法来处理。
glTexParameteri(GL_TEXTURE_2D, GL_TEXTURE_MIN_FILTER, _textureOptions.minFilter);

//If the size of the displayed texture is larger than the loaded texture, it would be processed using GL_TEXTURE_MAG_FILTER.
//当所显示的纹理比加载进来的纹理大时,采用GL_LINEAR的方法来处理。
glTexParameteri(GL_TEXTURE_2D, GL_TEXTURE_MAG_FILTER, _textureOptions.magFilter);

glTexParameteri(GL_TEXTURE_2D, GL_TEXTURE_WRAP_S, _textureOptions.wrapS);

glTexParameteri(GL_TEXTURE_2D, GL_TEXTURE_WRAP_T, _textureOptions.wrapT);

//The configuration parameters of texutures using above are all saved in GPUTextureOptions. Also, this structure could be created with different parameters if needed.
//以上配置texture的参数都存放在GPUTextureOptions结构体中,使用时候如果有特殊要求,也可以自己创建然后通过初始化方法传入。
}

注:以上源码中最后两行的注释,Non-Power-of-Two Textures译为无二次幂限制的纹理。大概意思是纹理大小可以不等于某个数的二次幂。
// This is necessary for non-power-of-two textures

The simple explanation of WRAP configuration for textures shows below.

http://blog.csdn.net/wangdingqiaoit/article/details/51457675

· Framebuffer

In OpenGL framework, the object of frame buffer is called the FBO. In my view, if the texture was the content outside a can, the frame buffer would be the piece of paper wrapped on the can. The frame buffer is used for buffering textures and rendering them on the screen, and this is the ‘render to texture’ process. Of course, frame buffers could not only buffer the original texture but also the texture processed by Open GL. For instance, in addition to the brand name, logo and other information of the canned milk in the photo, it seems to have the special texture and reflection effects. This could be made by obtaining the original image in the reflection for transparency, stretching, fogging, etc. After these process, the same image as the actual reflection is produced, and rendered to the can last.

Regard to this, the texture could be a part of the frame buffer. Hence, in GPUImage, the address of texture is defined as a property in GPUImageFramebuffer. There are also some situations that the framebuffer is not necessary to create. For example, when the input is being initialised like a GPUImagePicture object, only creating texture but no any frame buffer should be fine when loading image sources. There is an initialisation method of GPUImageFramebuffer that has a parameter onlyGenerateTexture. When onlyGenerateTexture equals to YES, this initialised object only has textures but no any frame buffer.

//Binding a named texture with a target. After binding, the previous bindind would be no longer available. If it's the first time binding, the type of the texture would be set the same as the target. Detailed explanation: http://www.dreamingwish.com/frontui/article/default/glbindtexture.html
//将一个命名的纹理绑定到一个纹理目标上,当把一张纹理绑定到一个目标上时,之前对这个目标的绑定就会失效。当一张纹理被第一次绑定时,它假定成为指定的目标类型。例如,一张纹理若第一次被绑定到GL_TEXTURE_1D上,就变成了一张一维纹理;若第一次被绑定到GL_TEXTURE_2D上,就变成了一张二维纹理。当使用glBindTexture绑定一张纹理后,它会一直保持活跃状态直到另一张纹理被绑定到同一个目标上,或者这个被绑定的纹理被删除了(使用glDeleteTextures)。

glBindTexture(GL_TEXTURE_2D, _texture); 
//Setting a 2D or cubic texture. Detailed explanation: http://blog.csdn.net/csxiaoshui/article/details/27543615
//用来指定二维纹理和立方体纹

glTexImage2D(GL_TEXTURE_2D, 0, _textureOptions.internalFormat, (int)_size.width, (int)_size.height, 0, _textureOptions.format, _textureOptions.type, 0); 
//The parameter GL_COLOR_ATTACHMENT0 tells OpenGLES to bind the texture object to the binding point 0 of the FBO (each FBO can bind multiple colors at one time, and each of them corresponds to a binding point of the FBO). And the parameter GL_TEXTURE_2D specifies the texture with a two-dimensional format. _Texture saves a texture identifier which points to a previously prepared texture object. The texture can be a multi-mapped image. And the last parameter indicates a level of 0, which refers to using the original image. 
//参数GL_COLOR_ATTACHMENT0是告诉OpenGLES把纹理对像绑定到FBO的0号绑定点(一个FBO在同一个时间内可以绑定多个颜色缓冲区,每个对应FBO的一个绑定点),参数GL_TEXTURE_2D是指定纹理的格式为二维纹理,_texture保存的是纹理标识,指向一个之前就准备好了的纹理对像。纹理可以是多重映射的图像,最后一个参数指定级级为0,指的是使用原图像。

glFramebufferTexture2D(GL_FRAMEBUFFER, GL_COLOR_ATTACHMENT0, GL_TEXTURE_2D, _texture, 0); 
//This is the last step of creating a frambuffer and binding it with a texture. I suppose that the texture should be released from the frame buffer after binding.
//这是在创建framebuffer并绑定纹理的最后一步,个人理解是在绑定之后framebuffer已经获得texture,需要释放framebuffer对texture的引用。

glBindTexture(GL_TEXTURE_2D, 0); 

There is a private method of the class GPUImageFramebuffer which is -(void)destroyFramebuffer. This method would be called when the object is deallocating. The key code of the method is:

glDeleteFramebuffers(1, &framebuffer);

framebuffer = 0;

2. Managing Objects of GPUImageFramebuffer

I believe that many people who have used GPUImage framework have had the same experience encountered this assert. Let’s take a specific example to illustrate what GPUImage does to GPUImageFramebuffer. The scenario is: to create a GPUImagePicture object picture, a GPUImageHueFilter object filter and a GPUImageView object imageView. The procedure is the pic is processed by the filter, then displayed on the imageView. Let’s take a look at what happens to the GPUImageFramebuffer during the entire process.

· Framebuffer in the picture object of GPUImagePicture

After performing a series of processing on the initialised UIImage object, the pic gets its own framebuffer:

It can be seen that the framebuffer object is not created during initialising the GPUImageFramebuffer, but is obtained by calling one of the methods of the singleton [GPUImageContext sharedFramebufferCache]. sharedFramebufferCache is actually a common subclass object of NSObject, and it does not have the available processing function of data cache like NSCache object. But GPUImage has this sharedFramebufferCache object in a single instance to manage the framebuffer objects generated during the process. The method for obtaining framebuffers has two parameters: 1. the size of the texture. Normally this size is the initial size of the input picture. Of course, there are some other situations about sizes that will be mentioned later; 2. whether to return a framebuffer object with textures only.

Step 1.

The inputs of the texture size, textureOptions (default) and a unique loopupHash generated by the method -sharedFramebufferCache的- (NSString *)hashForSize:(CGSize)size textureOptions:(GPUTextureOptions)textureOptions onlyTexture:(BOOL)onlyTexture; called by the texture. It can be seen that the lookupHash retrieved by GPUImagePicture objects with the same texture size is the same.

Step 2.

The lookupHash is used as a key for finding numberOfMatchingTexturesInCache from the dictionary property framebufferTypeCounts in sharedFramebufferCache. Literally, it equals to the number of GPUImageFramebuffer objects that meet the conditions in the cache. And the converted integer type of it is numberOfMatchingTextures.

Step 3.

If numberOfMatchingTexturesInCache is less than 1, that is, if there is no available GPUImageFramebuffer objects that meet the conditions in the cache, the GPUImageFramebuffer initialisation method is called to generate a new framebuffer object then. Otherwise, lookupHash and (numberOfMatchingTextures – 1) would be stitched into a key for retrieving framebuffer objects from another dictionary framebufferCache. Then, the value of numberOfMatchingTexturesInCache in framebufferTypeCounts would be updated by minus 1.

Step 4.

If the last returned framebuffer object is nil, it should be initialised in case.

Step 5.

-(void) lock; method of the framebuffer object as the return value would be called. framebufferReferenceCount would be added 1 then. framebufferReferenceCount is a property of framebuffer, which equals to 0 when the framebuffer initialized. And this property means the number of times the object is referenced literally. This is because the framebuffer object should be referenced by its pic and the image content would be loaded then.

However, different from GPUImageFilter type object, [outputFramebuffer disableReferenceCounting]; would be called after the framebuffer obtained. This method sets the frameCounter’s referenceCountingDisabled to YES. And the value of this attribute in-(void) lock; would lead to different results. If referenceCountingDisabled equals to YES, the framebufferReferenceCount would not plus 1.

- (void)lock;
{

if (referenceCountingDisabled)

{

return;

}

framebufferReferenceCount++;

}

However, the problem lies here. Before the pic obtains the framebuffer, -(void) lock; is called when the framebuffer was found from sharedFramebufferCache. At this time, the framebufferReferenceCount of the framebuffer object obtained by pic has been plus 1. And the referenceCountingDisabled is set to YES after this situation, which causes the outputFramebuffer property of the pic object dealloc not being released, leading to a memory leak. In order to address this problem, I wrote a caterogy of GPUImagePicture, overriding the dealloc method, and replaced the original [outputFramebuffer unlock]; with [outputFramebuffer clearAllLocks]; to ensure that the framebufferReferenceCount of the outputFramebuffer would be reset to 0, so that the outputFramebuffer can be released successfully.

· Framebuffer in the filter object of GPUImageHueFilter

There is the simplest structure of a single input source filter object as an example, and it is through the GPUImageHueFilter object. a filter is the same as a pic, which means it will get a framebuffer storing the processed data from sharedFramebufferCache and pass it to the next object. The difference is that filter has a firstInputFramebuffer variable, which is used to reference the outputFramebuffer of the previous node. If it is a filter object that inherits from GPUImageTwoInputFilter, its variables will have an additional secondInputFramebuffer. If you want to go through a filter, you must use the filter as the target of pic and call pic’s processImage method. The method invocation order in the filter is:

1. Referencing the input framebuffer and calling the lock method. Assume that the framebuffer of the pic is created by initialization. The framebufferReferenceCount before passing in is 1 and the framebufferReferenceCount after passing this method is 2.

- (void)setInputFramebuffer:(GPUImageFramebuffer *)newInputFramebuffer atIndex:(NSInteger)textureIndex {


firstInputFramebuffer = newInputFramebuffer;

[firstInputFramebuffer lock];

} 

2. Processing of the filter operating, that is, rendering the texture of the framebuffer. It’s quite complicated here, so this part doesn’t involve the specific rendering process.

- (void)renderToTextureWithVertices:(const GLfloat *)vertices textureCoordinates:(const GLfloat *)textureCoordinates;

The outputFramebuffer of the filter is the same as the pic, which is retrieved from sharedFramebufferCache. Therefore, the framebufferReferenceCount of the framebuffer is already 1 when the outputFramebuffer variable is assigned. Then there is a judgment condition: usingNextFrameForImageCapture. A global search in the class found that when calling -(void) useNextFrameForImageCapture, usingNextFrameForImageCapture will be set to YES. So when will this method be called? Those who use GPUImage to write the simplest off-screen rendering function could get a little familiar with this method, that is, this method must be called before the image is exported when filter processing. why? The reason lies in this judgment condition. If usingNextFrameForImageCapture is YES, then the outputFramebuffer needs to be locked again, in order to ensure that the outputFramebuffer needs to be referenced after the processing is completed. So that the image object can be generated from it, otherwise it will be recycled into shareFramebufferCache.

After these steps, this unlock method of the input source is finally called. At this time, the framebufferReferenceCount of firstInputFramebuffer would be 0 generally. And firstInputFramebuffer would be added to shareFramebufferCache.

[firstInputFramebuffer unlock];

3. Next, In this executed method, it will pass its own outputFramebuffer to the next node in the chain, just like the process of the pic to the filter.

- (void)informTargetsAboutNewFrameAtTime:(CMTime)frameTime;

[Self framebufferForOutput] would return outputFramebuffer in a general filter. If usingNextFrameForImageCapture equals to YES, you can simply understand that if the outputFramebuffer of the current object is passed to the next target and there are other uses, do not leave the outputFramebuffer variable blank. If usingNextFrameForImageCapture is NO, the current outputFramebuffer is set to nil, but the original framebuffer pointed to by outputFramebuffer would not be recycled to shareFramebufferCache. The reason is the framebuffer has been passed to the next target, and the lock method is called on the framebuffer in the corresponding assignment method. Repeatedly, until the last node, either generating a picture or displaying it.

GPUImage – Processing Flow

As I mentioned in the previous two posts, the execution process of GPUImage is like a chain or line in series, which is called Pipeline officially. It is no doubt that there must be an origin for a pipeline. Therefore the first thing have to do if you wanna use GPUImage is preparing the origin, as well as the input. Then, a series of defined filter nodes would receive and calculate data from input and finally the processed result could be export from the pipeline. So it’s critical to understand how GPUImage deals with input. This post introduces the explicit procedure of using static images as input of GPUImage since most time I used to use GPUImage to process static images. And maybe someday I will update the process of using videos as input, hopefully.

You can see from the wiki that GPUImage provides four classes with different source types which could be used as input, and I add another one additionally. Two of them, which are GPUImagePicture and GPUImageRawDataInput are the classes using static image sources to initialising input. Before explaining these two classes, I would like to say something about GPUImageOutput, which are the father-class of all the classes used as input in GPUImage.

GPUImageOutput

The content of comments in the head file of GPUImageOutput is:      

/** GPUImage's base source object
 
 Images or frames of video are uploaded from source objects, which are subclasses of GPUImageOutput. These include:
 
 - GPUImageVideoCamera (for live video from an iOS camera) 
 - GPUImageStillCamera (for taking photos with the camera)
 - GPUImagePicture (for still images)
 - GPUImageMovie (for movies)
 
 Source objects upload still image frames to OpenGL ES as textures, then hand those textures off to the next objects in the processing chain.
 */

In Chinese: 图片或者视频帧可通过继承了GPUImageOutput的资源对象进行加载,资源对象把图片或者视频帧加载到OpenGL ES的纹理中,处理完成后再把这些纹理传递处理管道中的下一个对象。

In other words, the features of all sub-classes of GPUImageOuput are:

  • transmit textures to the next objects/nodes (there can be more than one objects/nodes as the next).
  • an image can be generated from textures.

Hence, there are three parts of implementation of this class as follows:

  • self data management
  • data transmitting management
  • export image

Next, some properties and functions are introduced from these three aspects in English and Chinese respectively.

1.Data Management

//This variable is the content in each object. During the execution of image processing by GPUImage or OpenGL ES, the image content would be put into Buffer firstly. Framebuffer means the object which is used to render a single image or frame, and it's corresponding to the FBO in GPUImage. It can be noticed that OOP is used in OpenGL ES as well. While there are some limitations becasue it's based on C, some advantages of OOP could not be revealed well when using OpenGL ES. So Framebuffer is became as a real class in GPUImage. In my opinion, FrameBuffer = textures + parameters. 
//这个就是所有管道中每个节点传递的内容。GPUImage或者说OpenGL ES处理图片或者视频过程中,会将需要处理的图像内容放置到Buffer中处理。Framebuffer顾名思义,就是用来渲染单张图片或者一帧图像内容的对象,也就是传说中的FBO在GPUImage中的对应。可以看出,在OpenGL ES中也把其对象化,但本身基于C的api限制,在使用的时候并不能体现面向对象的特征,因此GPUImage把它严格意义上的变成了一个对象类型。我对FrameBuffer的理解是一个带有图片原始内容(texture)+各种纹理参数的类。

GPUImageFramebuffer *outputFramebuffer;

An unique management method of GPUImage to manage the objects of FrameBuffer should be spent another single post to illustrate. And for now, it could be thought as an object of GPUImageOutput temporarily. THis object must have a variable called ‘outputFramebuffer’, which is to save the processed data and hand it off to the next objects.        

I did not find the initialisation code of ‘outputFramebuffer’ in GPUImageOutput, since different types of data and the unique management method mentioned above. So the initialisation code of ‘outputFramebuffer’ is placed in each sub-class of GPUImageOutput.

//This function is used to hand self outputFramebuffer off to the next objects, as well as one of the input parameters 'target'. For the second parameter 'inputTextureIndex', basically means each object can have more than one input.
//这个方法就是用来把自身的outputFramebuffer传递给下一个目标节点,也就是方法中的target。另外可以注意到方法还有第二个参数inputTextureIndex,简单理解就是,每个节点的输入源不一定只有一个。简单的处理流程一般都为一张图片加一个滤镜输出,但要实现对于把两张或者多张图片进行合并后输出这种需要两个以上输入源的需求时就需要增加这个参数来。

- (void)setInputFramebufferForTarget:(id)target atIndex:(NSInteger)inputTextureIndex;
{
 [target setInputFramebuffer:[self framebufferForOutput]       atIndex:inputTextureIndex];
}

2.Data Transmitting Management

//The variable 'targets' is used to record the next added objects. So for each object/node, there is not only one direct way, since each object can have more branches. For instance, a specific image is set as input, then this image could be mosaic and sharpen respectively and two processed image could be exported. 
//targets用于记录自身对象添加过的目标节点,所以对于一个管道来说,并不是只有一条路,每个节点都可以产生多个分支。例如,一张图片作为输入源,可以分别进行加马赛克和图片锐化操作,最终导出两张图片。

//The variable 'targetTextureIndices' records the input sequences of a object/node saved in array 'targets'. This sequences is essential for the next object if this object has several input, since it directly influences self frameBuffer and the result effects.
//targetTextureIndices 用于记录targets数组中对应下标的某个目标节点的输入顺序。这个顺序对于需要多个输入源的目标节点非常重要,决定了这个目标节点自己的frameBuffer的各种样式还有处理后的效果。值的范围在对应目标节点需要的输入源个数内,例如target0对象需要2个输入源,那targetTextureIndices中对应下标的元素值为0或者1。

NSMutableArray *targets, *targetTextureIndices;
//Obvious meaning.
//字面意思:当前目标对象是否要忽略。忽略的意思就是在处理管道中要不要选择不做这个目标对象的处理。

@property(readwrite, nonatomic) BOOL shouldIgnoreUpdatesToThisTarget;
//The two functions below are used to point out the next objects/nodes. If the number of input of the next target is two, then these two inputs should call function 'addTarget' following the sequence. The parameter 'textureLocation' of the first added object equals to 0, the other one is 1.
//以下两个方法就是用来设置下一个目标节点的方法。如果下个target需要两个输入源,那么这两个输入源需按顺序调用addTarget,先add的对象的textureLocation为0,另一个则为1。方法中有两个操作比较重要:1.调用- (void)setInputFramebufferForTarget:(id)target atIndex:(NSInteger)inputTextureIndex;方法,在添加时就把自己所属的frameBuffer传递给了刚添加好的target。2.把添加的target以及自己在这个target中所占的下标保存管理。再会发现,这些操作都在一个定义好的队列中实现,如下下:

- (void)addTarget:(id)newTarget;

- (void)addTarget:(id)newTarget atTextureLocation:(NSInteger)textureLocation;

The implementation of initialisation of the self-defined queue is in the file ‘GPUImageContext’. It can be seen that the running hardware environment determines whether this queue is serial or concurrent. All tasks are added into the queue sychronously, in order to make sure that each step are executed in series through the entire pipeline. In this way, every target could be processed and every content of them are exist and correct.

_contextQueue = dispatch_queue_create("com.sunsetlakesoftware.GPUImage.openGLESContextQueue", GPUImageDefaultQueueAttribute());
dispatch_queue_attr_t GPUImageDefaultQueueAttribute(void)
{
#if TARGET_OS_IPHONE

if ([[[UIDevice currentDevice] systemVersion] compare:@"9.0" options:NSNumericSearch] != NSOrderedAscending)
{
return dispatch_queue_attr_make_with_qos_class(DISPATCH_QUEUE_SERIAL, QOS_CLASS_DEFAULT, 0);
}

#endif
return nil;
}
//You need to remove the targets which were added before. When there are some targets which are abundant or need to modify their effects, you should remove them from their previous objects. The below functions are used to do removing. If the target which should be removed is in the middle of the pipeline, additionally before removing it, the targets in it should be removed. It just likes a carriage of a train, it would be completely removed from the train only the previous and the next carriages of it removed. Of couse, for deallocation these removing operations are not necessary to execute in ARC.
//有添加就有移除,当当前管道中某些target的处理效果不需要或者需要更改的时候,你可以把这些节点从它的上一站移除,这个移除的操作就需要它的上一节点对象调用以下方法实现。如果作为中间节点,还需要把自己所添加的target移除。就像火车中的中间一截车厢,需要把自己与上一截和下一截的链接都去掉,才可以完全移除。当然在ARC下,全部销毁的时候不需要做这些移除工作。

- (void)removeTarget:(id)targetToRemove;

- (void)removeAllTargets;

3.Processed Image Exporting

One of the most convenient and useful features is the processed image could be exported from all objects which are GPUImageOutput. However, GPUImageOutput is just a base class. Since it does not provide the implementation code of the above two features and image exporting, the sub-classes should overwirte those functions.

- (void)useNextFrameForImageCapture;
{

}
- (CGImageRef)newCGImageFromCurrentlyProcessedOutput;
{
    return nil;
}

But you can find the detailed image exporting procedure in the function of – (CGImageRef)newCGImageByFilteringCGImage:(CGImageRef)imageToFilter.

  1. As a source object, ‘stillImageSource’ should be added to the current target object.
  2. Before calling the function ‘processImage’ of the target object, the function of ‘useNextFrameForImageCapture‘ should be called. Otherwise, crash!
  3. Calling ‘processImage’.
[self useNextFrameForImageCapture];   

[stillImageSource addTarget:(id)self];

[stillImageSource processImage];

CGImageRef processedImage = [self newCGImageFromCurrentlyProcessedOutput];

This post introduces the three most important parts of GPUImageOutput, while some specific stuff like frameBuffer, processing queue and other properties and functions do not metioned detailly. This is because the design pattern of GPUImage is so elegant, the author encapsulated and prepared almost all points which related to detailed processing flow. I’ll explain them someday. And if there are some doubts or questions, don’t hesitate to discuss with me. Cheers:)

GPUImage – Interpreting GPUImage’s wiki in Chinese

If I could find a document about GPUImage in Chinese, I would have not so much troubles when I learnt how to use it. But recently I noticed there are several people has translated the wiki of GPUImage in GitHub to Chinese already. So for this post, I just pick some important points up from it and explaining in my own ideas. Therefore, I cannot translate this post in English LOL. BTW, the cover is the one of works created by the application with GPUImage as well, and this pic is used for celebrating the Chinese Monkey Year. 

Overview        

GPUImage可以对图片、摄像头实时影像、视频添加通过GPU加速的滤镜和图像处理效果。

与iOS5.0上的CoreImage框架比较,GPUImage的优势:可以自定义滤镜(通过自定义glsl语句来实现);不足:没有人脸检测等此类先进技术(话说现在已经相对不先进了吧。。)。

如果需要对图片或者视频进行大量计算,那么GPU实现可以说是首选,iPhone4上比较快了100倍。

使用GPU处理图像需要编写大量代码才可实现,作者就先写了一篇demo(http://www.sunsetlakesoftware.com/2010/10/22/gpu-accelerated-video-processing-mac-and-ios)。之后发现其实之间有很多可模版化的内容,再结合具体使用,最后开发出了GPUImage。意思就是使用GPUImage可以实现基于OpenGLES2.0的GPU处理图像工作并且基本不需涉及OpenGLES2.0的api。

Technical requirements

iOS5+,ARC,有摄像头,…现在已经不存在不满足要求的吧。

General architecture

这个在第一篇当中已经大致说明我自己的理解,此处就照本翻译。

GPUImage是通过OpenGL ES 2.0着色器实现图片和视频的处理计算,所以会比CPU更快。并且!在使用过程中不需要涉及复杂的OpenGLES2.0的api,而是提供封装好的OC实现的类和方法即可实现图片或视频的多步骤处理操作、并能导出处理完成的结果。

视频或图片载入后会以GPUImageOutput的一种子类为类型的资源对象存在。GPUImage具备的资源类有:GPUImageVideoCamera、GPUImageStillCamera、GPUImagePicture、GPUImageMovie(我记得还有一种:GPUImageRawDataInput。具体使用之后细说)。资源对象会把图片或视频载入到纹理(OpenGLES中的一种存储图片信息的具体对象),并且把这些纹理传入具体的处理流程。

在整个处理流程链中的滤镜或者说除了输入源之后的对象,都需要遵循GPUImageInput协议,只有这样才能拿到上一个步骤处理完成的纹理进行相应处理。这些对象会经过预先设置好的所有目标对象中,并且处理过程中可以有多个分支的存在,即有多个下一步骤的路径。

总结:通过GPUImage可以创建一个滤镜链,链中可以有多个分支,载入所需输入源后经过每个步骤的处理可得到一个或者多个结果。

Performing common tasks(挑重点)

Filtering live video

通过CustomShader.fsh(glsl语句构成)文件作为参数生成的自定义滤镜customFilter可以作为一个目标(target)添加到从摄像头获取到的实时影像帧对象上。最终,这些经过滤镜处理后的帧内容会显示在一个继承自UIView并且可以把纹理显示出来的视图(GPUImageView,其实最终是通过它的layer,即CAEAGLLayer对象来展示)上。

接下来提到了一个重点:GPUImageView的fillMode属性。源码中该属性的每个枚举都有简短的解释:1.kGPUImageFillModeStretch,  // Stretch to fill the full view, which may distort the image outside of its normal aspect ratio。拉伸内容至填满整个视图,可能会照成图片被不等比拉伸至变形。

2.kGPUImageFillModePreserveAspectRatio,          // Maintains the aspect ratio of the source image, adding bars of the specified background color。保持显示图片的原比例,在未铺满区域显示设置的背景颜色。

3.kGPUImageFillModePreserveAspectRatioAndFill    // Maintains the aspect ratio of the source image, zooming in on its center to fill the view。保持显示图片的原比例,等比放大填充整个视图并居中显示。

这个fillMode在我实际项目中给我带来了一些困扰。所以这里就先简单翻译,想在之后单独针对GPUImageView的文章中详细说明。

如果想在通过GPUImage录制视频时也把声音录进去,那么可以设置GPUImageVideoCamera对象的audioEncodingTarget属性。

Capturing and filtering a still photo

这里提到的一点是:在某些设备上是支持不到2048或者更高像素的摄像头图片捕捉,原因是这些设备对纹理大小有相应的限制,翻开源码,可以从继承自GPUImageOutput的五个资源类中发现,初始化资源将信息写入纹理时,会做一次资源文件大小的判断。因为对应生成的纹理对象是根据资源文件大小来生成的,所以如果过大,则会使用当前设备所支持的最大纹理大小来进行生成。纹理既然作为一个编辑过程中实时存储数据信息的对象,它也是会占据相应内存的,并且在处理过程中,如果纹理过大,或者说纹理中待处理的信息过多,也会给GPU带来压力。所以即使在使用GPUImage对图片或者视频进行处理的过程中,同样需要注意处理资源的大小问题。

Processing a still image

对一张静态图片进行滤镜或者其他效果处理可以说是GPUImage的基础入门操作(我是这么认为)。

1.使用GPUImagePicture的初始化方法,可以将一张静态图片载入到纹理中。不过GPUImagePicture的初始化方法有好几个,具体区别同样之后再细说。

2.可以通过继承自GPUImageFilter的类的对象调用imageFromCurrentFramebuffer方法得到处理后的图片。但如果要使用这种方法导出图片,则必须要在GPUImagePicture对象执行processImage方法之前执行滤镜对象的useNextFrameForImageCapture方法,否则按照GPUImage的源码来看注定会crash,控制台的提示“Tried to overrelease a framebuffer, did you forget to call -useNextFrameForImageCapture before using -imageFromCurrentFramebuffer?”。

3.另一种导出处理图片的方法是调用滤镜对象的imageByFilteringImage方法,入参为UIImage对象。

Writing a custom filter

GPUImage相比CoreImage另一个大优势在于可以自定义滤镜,通过glsl语言(OpenGL Shading Language,十分类似C语言的OpenGL着色器语言)实现。GPUImage库中的绝大多数滤镜都是通过自定义的glsl语句进行对片段着色器操作,之前也有说过,因为大多数滤镜只改变纹理内容,并不会涉及到如何贴图,或者说如何展示纹理。

Filtering and re-encoding a movie

视频文件通过GPUImageMovie类载入,GPUImageMovieWriter类导出。需要注意的点有:

1.记录,或者说处理完成后,需要将GPUImageMovieWriter对象从上一个target(一般都为GPUImageFilter对象)中移除,并且调用自身的finishRecording方法。

2.如果在记录完成前坏了,那之前的处理导出内容也没了。

Interacting with OpenGL ES

通过GPUImage的GPUImageTextureOutput和GPUImageTextureInput类,可以从OpenGLES中导入或者导出纹理。使用这种方式的过程中要注意,待处理的纹理需要通过类似共享群组的东西在GPUImage自身的OpenGLES的context和其他context之间实现共享。

Built-in filters

GPUImage库中提供125种左右的内建滤镜。

这个我记得网上已经有大神对文档中有说明的滤镜做了详细的翻译,之后会针对比较常用或者特殊的滤镜做详细说明,此处就不翻译了。

Sample applications

又想起第一次接触GPUImage时,不看文档直接download,run,完了完全不知道每个demo的具体实现内容。所以建议初学者在接触到新的三方库或者源码时,不要急着run,先看看文档或者源码注释,可能会更好上手。

1.SimpleImageFilter:对一张静态图片进行滤镜操作,保存到disk。

2.SimpleVideoFilter:马赛克录像,滑杆可调整马赛克颗粒大小。

3.SimpleVideoFileFilter:对disk中的视频文件进行虚化处理,并保存为另一个视频文件。

4.MultiViewFilterExample:摄像头实时滤镜效果,多个滤镜叠加,并且其中两个是自定义滤镜。

5.FilterShowcase:GPUImage内建滤镜的全部展示,这个demo中的判断语句优点复杂。

6.BenchmarkSuite:GPUImage与基于CPU实现的图片处理效果以及CoreImage做的处理效率比较。

7.CubeExample:说明GPUImage与OpenGLES渲染的相互关系。给摄像头获取到的每一帧内容加上sepia(乌贼色效果?)的滤镜并且显示在一个立方体的表面,可以用手机旋转立方体。立方体被渲染成一个texture-backed(没懂)的frambuffer对象,再反馈给GPUImage进行马赛克处理后显示。

7.ColorObjectTracking:待解释。

I’ll translate the contents later.

GPUImage – Overview

As a quite famous and professional framework for image processing in iOS, GPUImage has been released for a long time (the first version were published in 2013). In this post, I would like to share my own ideas and thoughts about it. And the cover is the one of works created by my first application with GPUImage.

When I first heard about GPUImage, it was in the autumn of 2015, because of a new application project. Before that, I did my first job as an iOS developer in quite tranditional IT company in Shanghai, which mainly provides services for commercial firms. So you can image that my daily work was so tedious, all kinds of uses of TableView and CollectionView, data request and UI layout adaption, that’s it. Until now I still feel not good for dealing with the layout in iPad when it changes its orientation, while there are some useful frameworks can help to address this kind of situation.

After that, I went to Hangzhou. And I always think that was one of the best choise for my life, even if at the beginning the work was so tough. There was only one guy doing coding stuff, yes that was me. Also, the product manager was always late and always liked to change his mind. For that application, a totally new prototype were released every month in average. And I spent couple days to read the source code of the previous versions to grasp the implementation of filters and stickers. CoreImage, a build-in framework can easily implement a simple filter function. And the sticker function are achieved by using normal View — UIView. Those kinds of methods for image processing were usually mentioned by interviewees I met, who thougth they already can handle most issues of image processing in mobile devices.

And someday the product manager pulled a requirement which was to implement a function like the layer in PS. That was a so incredible abstacle for me who only know how to requrest and update data at that time. Obviously, it costed me several days and it was luck that I found a class ‘CALayer’ in ‘CoreAnimation’ framework can do it perfectly. In addition, I was suprised by the functions of its sub-classes, which can deal with almost all kinds of animations and UI effects. And next, the biggest problem was that I had realised that only like some specific image processing frameworks can help me to develop an application with complicated image processing functions like OpenGLES, OpenCV or Metal, while I didn’t have enough time to learn how to use them. Lastly, I found GPUImage from GitHub, and it saved my job.

The wiki of GPUImage in GitHub is not a concrete manual. You only can get three points from it:

  1. GPUImage is based on OpenGLES 2.0;
  2. The performance of GPUImage is better than Coreimage;
  3. The process of adding a filter to a static image, a video or a frame captured by camera and displaying the result on GPUImageView or generate a file with a specifi format.

Maybe it’s because I only can understand these three points, so I still could not know some other things of its execution process, like: why the function ‘processImage‘ must be executed after the code of adding filters; it would crash if the function ‘useNextFrameForImageCapture‘ was not executed before export processing result as an image; and what is glsl used for? Moreover, I could not find more information from the Internet at that time no matter English or Chinese. Hence, I almost gave up to use GPUImage to implement those complicated image processing requirements.

Then, I wanna say some my roughly understanding of GPUImage. If there are some problems or mistakes found, pls correct me, cheers.

1. Fragment Shader and Vertex Shader

OpenGLES processes images through Fragment Shader and Vertex Shader. GPUImage is a encapsulated and extended framework based on an iOS build-in framework ‘GLKit‘ which is encapsulated from OpenGLES. And the version of OpenGLES could be selected in GLKit, while the OpenGLES version in GPUImage is OpenGLES2.0. We should know that there are various differences betweent different versions of OpengGLES. In my opinion, the most filter functions or classes provided by GPUImage are implemented by a series operations through Fragment Shader. This is because the results of the most filters do not change the size and shape of the processed image, and it’s more like to generate new pixels by calculating the original pixels. This is one of the most usual uses of glsl, which can define the process of pixel calculation methods. So glsl is very important part of GPUImage if you wanna use it to generate unique and amazing results.

2. Pipeline

GPUImage provides a concept of pipeline. Unlike the line in Masonry, GPUImage treats each input, filter and output as a piece of pipeline, and only those pieces of pipeline are connected in series, the image information could be transmitted through each independent piece of pipeline as input and finally get to result. So this is my own simple understanding of the execution process of GPUImage.

3. MVP

As I mentioned previously, GPUImage makes every independent piece of pipeline be connected in series by a quite special design pattern in iOS development, which is called MVP. The compulsory classes for the execution process, as well as the classes which are allowed to connected with others, have some common features:

  1. They are all the sub-classes of GPUImageOutput except GPUImageView;
  2. They all obey the protocol of GPUImageInput, except the input classes (GPUImage provides five kinds of input classes which are GPUImagePicture、GPUImageRawDataInput、GPUImageMovie、GPUImageUIElement、GPUImageVideoCamera. It’s easy to know what types of input these classes can deal with).

The class ‘GPUImageOutput‘ is not used directly during the whole process, because all output classes used are its sub-classes. It can be noticed from their names that the general use of GPUImageOutput is to be used as a output and the classes following the GPUImageInput protocol is used as an input. So during the process of connecting each piece of pipeline:

  1. The first object is only as an input, so it must be one of the five input classes and also not follow the GPUImageInput protocol;
  2. The classes which need to be connected in the middle of pipeline, like GPUImageFilter, as well as the father class of all filter classes, not only is the sub-class of GPUImageOutput but also obey the protocol of GPUImageInput. This is because it needs to reveive data from its privous node, and transmit the data to the next node after processing done;
  3. As the last node/object, GPUImageView is not necessary to be the sub-class of GPUImageOutput, in order to no next node at all.

Those are three key points of GPUImage I suppose. Actually I wrote this post in Chinese almost 2 years ago. You see, time is always so fast. And I’ll keep translating other posts about GPUImage in English and hope if there is some chances that I can modify GPUImage or develop a new image processing framework which could implement more interesting effects.